Skip to content Skip to main navigation Report an accessibility issue
High Performance & Scientific Computing

Lustre User Guide on ISAAC Legacy


The Lustre file system on the cluster exists across a set of 42 block storage devices called Object Storage Targets (OSTs). The OSTs are managed by Object Storage Servers (OSSs). Each file in a Lustre file system is broken into chunks and stored on a subset of the OSTs. A single service node serving as the Metadata Server (MDS) assigns and tracks all of the the storage locations associated with each file in order to direct file I/O (input/output) requests to the correct set of OSTs and corresponding OSSs. The metadata itself is stored on a block storage device referred to as the MDT.

Lustre Components

The Lustre file system is made up of an underlying set of I/O servers called Object Storage Servers (OSSs) and disks called Object Storage Targets (OSTs). The file metadata is controlled by a Metadata Server (MDS) and stored on a Metadata Target (MDT). A single Lustre file system consists of one MDS and one MDT. The functions of each of these components are described in the following list.

  • Object Storage Servers (OSSs) manage a small set of OSTs by controlling I/O access and handling network requests to them. OSSs contain some metadata about the files stored on their OSTs. They typically serve between 2 and 8 OSTs, up to 16 TB in size each.
  • Object Storage Targets (OSTs) are block storage devices that store user file data. An OST may be thought of as a virtual disk, though it often consists of several physical disks, in a RAID configuration for instance. User file data is stored in one or more objects, with each object stored on a separate OST. The number of objects per file is user configurable and can be tuned to optimize performance for a given workload.
  • The Metadata Server (MDS) is a single service node that assigns and tracks all of the storage locations associated with each file in order to direct file I/O requests to the correct set of OSTs and corresponding OSSs. Once a file is opened, the MDS is not involved with I/O to the file. This is different from many block-based clustered file systems where the MDS controls block allocation, eliminating it as a source of contention for file I/O.
  • The Metadata Target (MDT) stores metadata (such as filenames, directories, permissions and file layout) on storage attached to an MDS. Storing the metadata on a MDT provides an efficient division of labor between computing and storage resources. Each file on the MDT contains the layout of the associated data file, including the OST number and object identifier and points to one or more objects associated with the data file.

Figure 1.1 shows the interaction among Lustre components in a basic cluster. The route for data movement from application process memory to disk is shown by arrows.

Figure 1.1 – View of the Lustre File System

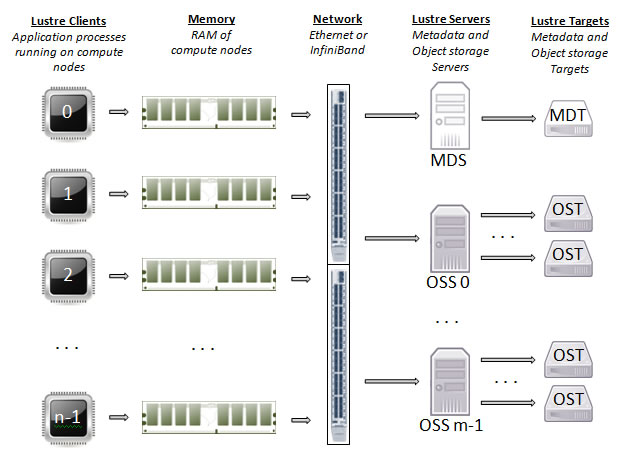
When a compute node needs to create or access a file, it requests the associated storage locations from the MDS and the associated MDT. I/O operations then occur directly with the OSSs and OSTs associated with the file bypassing the MDS. For read operations, file data flows from the OSTs to memory. Each OST and MDT maps to a distinct subset of the RAID devices. The total storage capacity of a Lustre file system is the sum of the capacities provided by the OSTs.

File Striping Basics

A key feature of the Lustre file system is its ability to distribute the segments of a single file across multiple OSTs using a technique called file striping. A file is said to be striped when its linear sequence of bytes is separated into small chunks, or stripes, so that read and write operations can access multiple OSTs concurrently.

A file is a linear sequence of bytes lined up one after another. Figure 1.2 shows a logical view of a single file, File A, broken into five segments and lined up in sequence.

Figure 1.2 – Logical View of a File

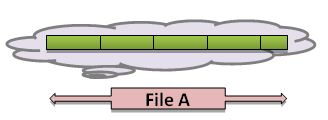
A physical view of File A striped across four OSTs in five distinct pieces is shown in Figure 1.3.

Figure 1.3 – Physical View of a File

Storing a single file across multiple OSTs (referred to as striping) offers two benefits: 1) an increase in the bandwidth available when accessing the file and 2) an increase in the available disk space for storing the file. However, striping is not without disadvantages, namely: 1) increased overhead due to network operations and server contention and 2) increased risk of file damage due to hardware malfunction. Given the tradeoffs involved, the Lustre file system allows users to specify the striping policy for each file or directory of files using the lfs utility. The lfs utility usage can be found in the Basic Lustre User Commands section.

Stripe Alignment

Performance concerns related to file striping include resource contention on the block device (OST) and request contention on the OSS associated with the OST. This contention is minimized when processes (who access the file in parallel) access file locations that reside on different stripes.

Additionally, performance can be improved by minimizing the number of OSTs in which a process must communicate. An effective strategy to accomplish this is to stripe align your I/O requests. Ensure that processes access the file at offsets which correspond to stripe boundaries. Stripe settings should take into account the I/O pattern utilized to access the file.

Aligned Stripes

In Figure 1.3 we gave an example of a single file spread across four OSTs in five distinct pieces. Now, we add information to that example to show how the stripes are aligned in the logical view of File A. Since the file is spread across 4 OSTs the stripe count is 4. If File A has 9 MB of data and the stripe size is set to 1 MB it can be segmented into 9 equally sized stripes that will be accessed concurrently. The physical and logical views of File A are shown in Figure 1.4.

Figure 1.4 – Physical and Logical View of File A

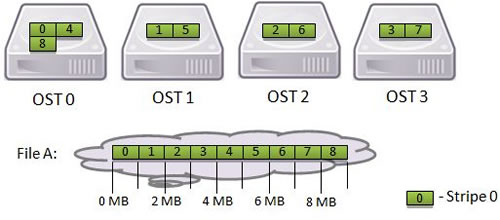
In this example, the I/O requests are stripe aligned, meaning that the processes access the file at offsets that correspond to stripe boundaries.

Non-Aligned Stripes

Next, we give an example where the stripes are not aligned. Four processes write different amounts of data to a single shared File B that is 5 MB in size. The file is striped across 4 OSTs and the stripe size is 1 MB, meaning that the file will require 5 stripes. Each process writes its data as a single contiguous region in File B. No overlaps or gaps between these regions should be present; otherwise the data in the file would be corrupted. The sizes of the four writes and their corresponding offsets are depicted in Figure 1.5.

  • Process 0 writes 0.6 MB starting at offset 0 MB
  • Process 1 writes 1.8 MB starting at offset 0.6 MB
  • Process 2 writes 1.2 MB starting at offset 2.4 MB
  • Process 3 writes 1.4 MB starting at offset 3.6 MB

The logical and physical views of File B are shown in Figure 1.5.

Figure 1.5 – Logical and Physical view of File B

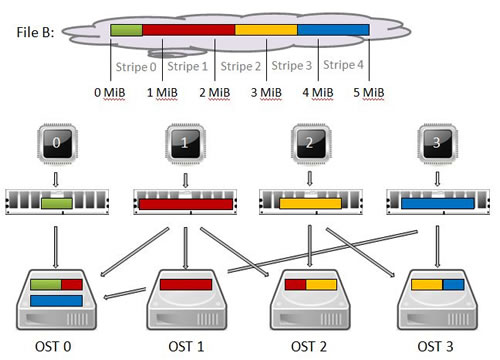
None of the four writes fit the stripe size exactly so Lustre will split each of them into pieces. Since these writes cross an object boundary, they are not stripe aligned as in our previous example. When they are not stripe aligned, some of the OSTs are simultaneously receiving data from more than one process. In our non-aligned example, OST 0 is simultaneously receiving data from processes 0, 1 and 3; OST 2 is simultaneously receiving data from processes 1 and 2; and OST 3 is simultaneously receiving data from processes 2 and 3. This creates resource contention on the OST and request contention on the OSS associated with the OST. This contention is a significant performance concern related to striping. It is minimized when processes (that access the file in parallel) access file locations that reside on different stripes as in our stripe aligned example.

I/O Benchmarks

The purpose of this section is to convey tips for getting better performance with your I/O on the cluster’s Lustre file system. You can also view our list of I/O Best Practices.

Serial I/O

Serial I/O includes those application I/O patterns in which one process performs I/O operations to one or more files. In general, serial I/O is not scalable.

Figure 2.1 – Write Performance for Serial I/O at Various Lustre Stripe Counts

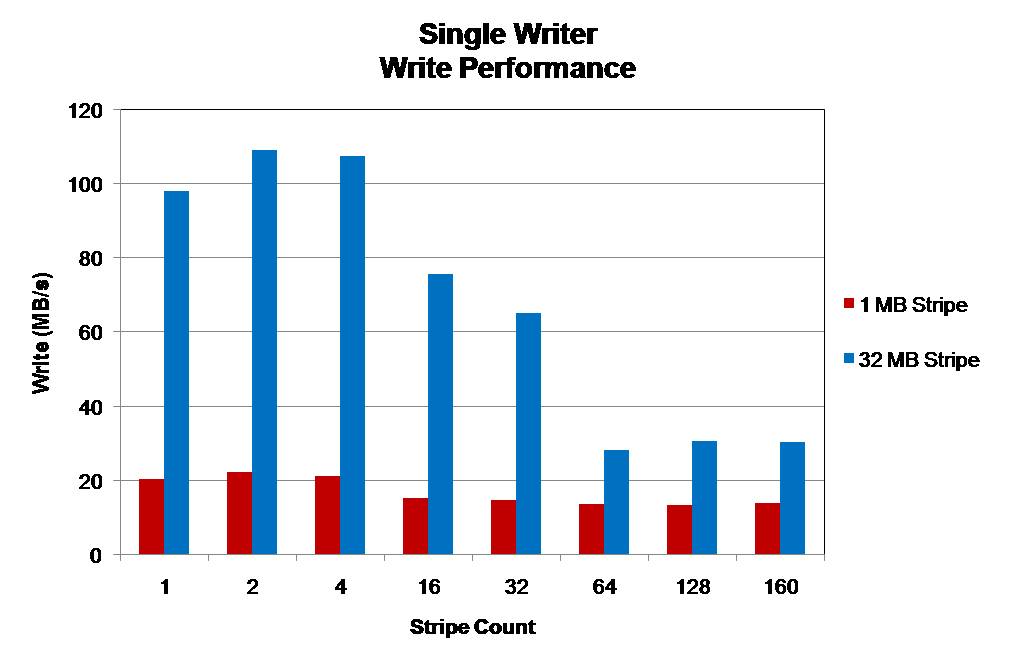
The file size is 32 MB per OST utilized and write operations are 32 MB in size. Utilizing more OSTs does not increase write performance. The best performance is seen by utilizing a stripe size which matches the size of write operations.

Figure 2.3 – Write Performance of a File-Per-Process I/O Pattern

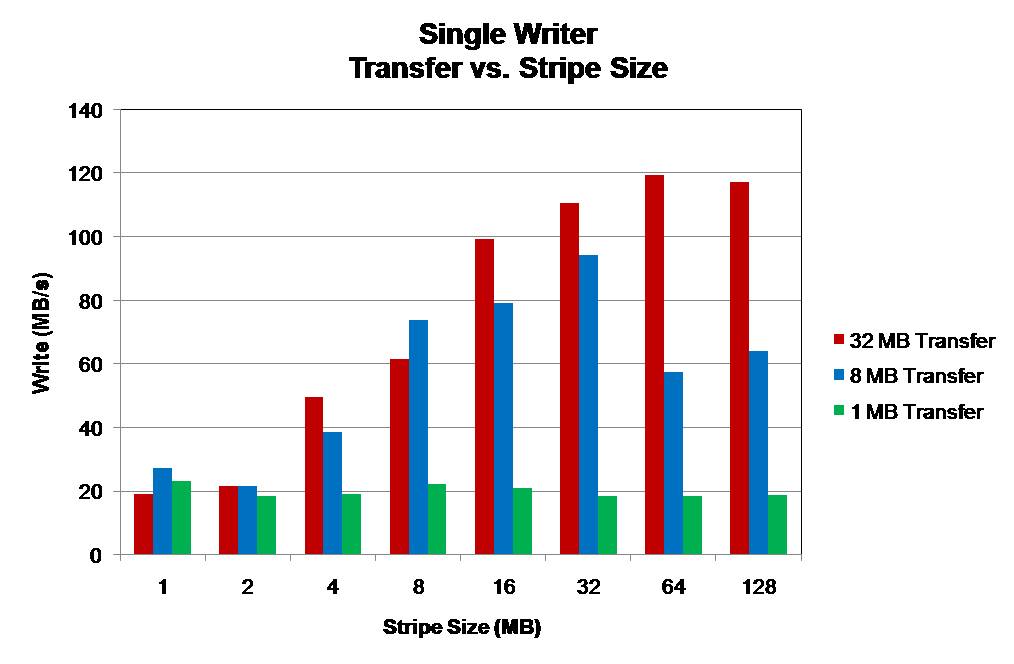
The utilized file is 256 MB written to a single OST. Performance is limited by small operation sizes and small stripe sizes. Either can become a limiting factor in write performance. The best performance is obtained in each case when the I/O operation and stripe sizes are similar.

  • Serial I/O is limited by the single process which performs I/O. I/O operations can only occur as quickly as the single processes can read/write data to disk.
  • Parallelism in the Lustre file system cannot be exploited to increase I/O performance.
  • Larger I/O operations and matching Lustre stripe settings may improve performance. This reduces the latency of I/O operations.

File-per-Process

File-per-process is a communication pattern in which each process of a parallel application writes its data to a private file. This pattern creates N or more files for an application run of N processes. The performance of each process’s file write is governed by the statements made above for serial I/O. However, this pattern constitutes the simplest implementation of parallel I/O due to the possibility of improved I/O performance from a parallel file system.

Figure 2.3 – Write Performance of a File-Per-Process I/O Pattern

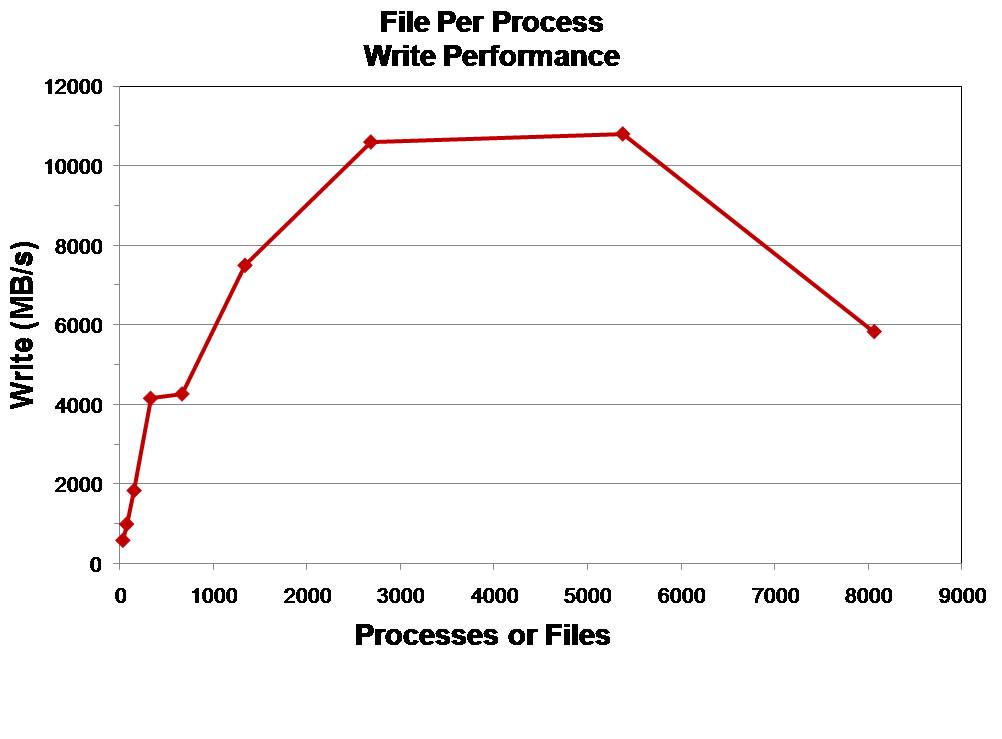
The file size is 128 MB with 32 MB sized write operations. Performance increases as the number of processes/files increases until OST and metadata contention hinder performance improvements.

  • Each file is subject to the limitations of serial I/O.
  • Improved performance can be obtained from a parallel file system such as Lustre. However, at large process counts (large number of files) metadata operations may hinder overall performance. Additionally, at large process counts (large number of files) OSS and OST contention will hinder overall performance.

Single-shared-file

A single shared file I/O pattern involves multiple application processes which either independently or concurrently share access to the same file. This particular I/O pattern can take advantage of both process and file system parallelism to achieve high levels of performance. However, at large process counts contention for file system resources OSTs can hinder performance gains.

Figure 2.4 – Two Possible Shared File Layouts

The aggregate file size in both cases is 1 and 2 GB depending on which block size is utilized. The major difference in file layouts is the locality of the data from each process. Layout #1 keeps data from a process in a contiguous block, while Layout #2 stripes this data throughout the file. Thirty-two (32) processes will concurrently access this shared file.

Figure 2.5 – Write Performance Using a Singe Shared File Accessed by 32 Processes

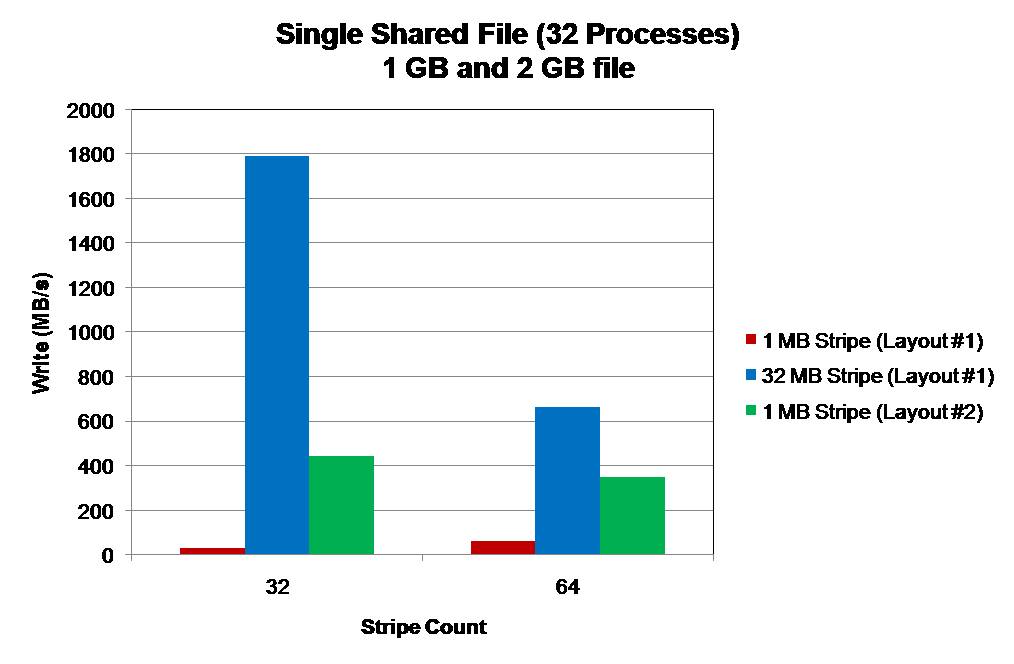
Stripe counts utilized are 32 (1 GB file) and 64 (2 GB file) with stripe sizes of 32 MB and 1 MB. A 1 MB stripe size on Layout #1 results in the lowest performance due to OST contention. Each OST is accessed by every process. The highest performance is seen from a 32 MB stripe size on Layout #1. Each OST is accessed by only one process. A 1 MB stripe size gives better performance with Layout #2. Each OST is accessed by only one process. However, the overall performance is lower due to the increased latency in the write (smaller I/O operations). With a stripe count of 64 each process communicates with 2 OSTs.

Figure 2.6 – Write Performance of a Single Shared File as the Number of Processes Increases

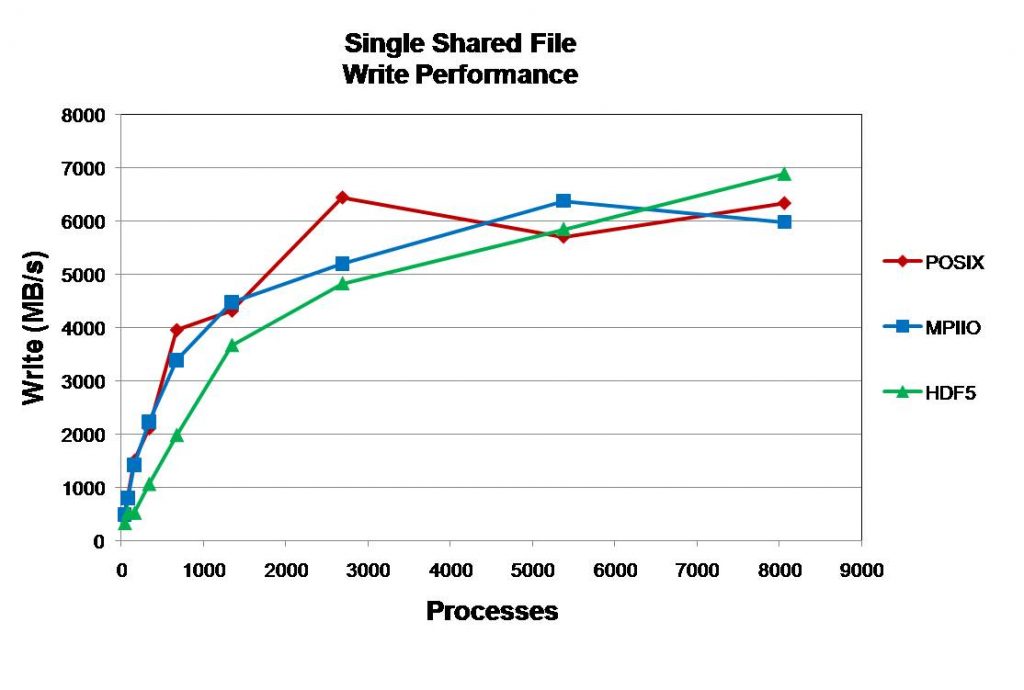
A file size of 32 MB per process is utilized with 32 MB write operations. For each I/O library (Posix, MPI-IO, and HDF5) performance levels off at high core counts.

  • The layout of the single shared file and its interaction with Lustre settings is particularly important with respect to performance.
  • At large core counts file system contention limits the performance gains of utilizing a single shared file. The major limitation is the 160 OST limit on the striping of a single file.

Basic Lustre User Commands

Lustre’s lfs utility provides several options for monitoring and configuring your Lustre environment. In this section, we describe the basic options that enable you to:

  • List OSTs in the File System
  • Search the Directory Tree
  • Check Disk Space Usage
  • Get Striping Information
  • Set Striping Patterns

For a complete list of available options, type help at the lfs prompt.

$ lfs help

To get more information on a specific option, type help along with the option name.

$ lfs help option-name

You may also execute man lfs to review a list of the utility’s options.

List OSTs in the File System

List OSTs in the File System

The lfs osts command lists all OSTs available on a file system, which can vary from one system to another. The syntax for this command is given in Figure 3.1.

lfs osts /path/to/filesystem

Figure 3.1 – Usage of the lfs osts Command

If a path is specified, only OSTs belonging to the specified path are displayed.

The lfs osts command displays the IDs of all available OSTs in the file system. Figure 3.2 shows the output produced by the lfs osts command on cluster’s Lustre Haven file system. From this output you can see that the cluster has 42 total OSTs available.

[user-x@acf-login5 user-x]$ lfs osts
OBDS:
0: haven-OST0000_UUID ACTIVE
1: haven-OST0001_UUID ACTIVE
----------Output Truncated----------
40: haven-OST0028_UUID ACTIVE
41: haven-OST0029_UUID ACTIVE

Figure 3.2 – Output of lfs osts on Lustre Haven

Search the Directory Tree

Search the Directory Tree

The lfs find command searches the directory tree rooted at the given directory / filename for files that match the specified parameters. To review a list of all the options you may use with lfs find, execute lfs find help or man lfs.

Note that it is usually more efficient to use lfs find rather than use GNU find when searching for files on Lustre.

Some of the most commonly used lfs find options are described in Table 3.1. For more options, please review the man page for the lfs utility.

ParameterDescription
–atimeFile was last accessed N*24 hours ago. (There is no guarantee that atime is kept coherent across the cluster.)
–mtimeFile status was last modified N*24 hours ago.
–ctimeFile status was last changed N*24 hours ago.
–maxdepthLimits find to descend at most N levels of the directory tree.
–print / –print0Prints the full filename, followed by a new line or NULL character correspondingly.
–sizeFile has a size in bytes or kilo-, Mega-, Giga-, Tera-, Peta- or Exabytes if a suffix is given.
–typeFile has the type (block, character, directory, pipe, file, symlink, socket or Door [Solaris]).
–gidFile has a specific group ID.
–groupFile belongs to a specific group (numeric group ID allowed).
–uidFile has a specific numeric user ID.
–userFile is owned by a specific user (numeric user ID is allowed).

Using an exclamation point “!” before an option negates its meaning (files NOT matching the parameter). Using a plus sign “+” before a numeric value means files with the parameter OR MORE. Using a minus sign “-” before a numeric value means files with the parameter OR LESS.

Consider an example of a 3-level directory tree shown in Figure 3.3.

Figure 3.3 – Three-Level Directory Tree

Results from using the lfs find command with various parameters are given in Table 3.2.

CommandResult
lfs find /ROOTDIR/ROOTDIR
/ROOTDIR/level_1_file
/ROOTDIR/LEVEL_1_DIR
/ROOTDIR/LEVEL_1_DIR/level_2_file
/ROOTDIR/LEVEL_1_DIR/LEVEL_2_DIR
/ROOTDIR/LEVEL_1_DIR/LEVEL_2_DIR/level_3_file
lfs find /ROOTDIR –maxdepth 1
or
lfs find /ROOTDIR –maxdepth 1 –print
/ROOTDIR
/ROOTDIR/level_1_file
/ROOTDIR/LEVEL_1_DIR
lfs find /ROOTDIR –maxdepth 1 –print0/ROOTDIR/ROOTDIR/level_1_file/ROOTDIR/LEVEL_1_DIR

The example in Figure 3.4 uses the -mtime parameter to provide a recursive list of all regular files in the user’s Lustre scratch directory that are more than 30 days old.

$ lfs find $SCRATCHDIR -mtime +30 -type f -print

Figure 3.4 – lfs find Used to Identify Files More than 30 Days Old

Check Disk Space Usage

Check Disk Space Usage

The lfs df command displays the file system disk space usage. Additional parameters can be specified to display inode usage of each MDT/OST or a subset of OSTs. The usage for the lfs df command is:

lfs df [-i] [-h] [path]

By default, the usage of all mounted Lustre file systems is displayed. Otherwise, if a path is specified the usage of the specified file system is displayed.

Descriptions of the optional parameters are given in Table 3.3.

ParameterDescription
-iLists inode usage per OST and MDT.
-hOutput is printed in human-readable format, using SI base-2 suffixes for Mega-, Giga-, Tera-, Peta-, or Exabytes.

The lfs df command executed on the cluster produces output shown in Figure 3.5.

[user-x@acf-login6 ~]$ lfs df
UUID                   1K-blocks        Used   Available Use% Mounted on
haven-MDT0000_UUID    1082699168    99812016   909840372  10% /lustre/haven[MDT:0]
haven-OST0000_UUID   61903554332 33544350108 25238374980  57% /lustre/haven[OST:0]
haven-OST0001_UUID   61903554332 33911860824 24870908984  58% /lustre/haven[OST:1]
...
haven-OST0027_UUID   92256420152 41485012384 46120514548  47% /lustre/haven[OST:39]
haven-OST0028_UUID   92256420152 38514035436 49091488120  44% /lustre/haven[OST:40]
haven-OST0029_UUID   92256420152 40269502908 47336093708  46% /lustre/haven[OST:41]

filesystem_summary:  2964183671784 1522280787344 1292470389060  54% /lustre/haven

Figure 3.5 – Output of the lfs df Command

You can see from this output that the file system is fairly balanced with none of the OSTs near 100% full. However, there are times when a Lustre file system becomes unbalanced meaning that one of the file’s associated OSTs becomes 100% utilized. An OST may become 100% utilized even if there is space available on the file system. Examples of when this may occur include when stripe settings are not specified correctly or very large files are not striped over multiple OSTs. If an OST is full and you attempt to write to the file system, you will get an error message.

An individual user can run lfs quota -u $USER $SCRATCHDIR to see their own usage. However, this will not let users see other people’s usage.

[user-x@acf-login6 ~]$ lfs quota -u $USER $SCRATCHDIR
Disk quotas for usr user-x (uid 99999):
     Filesystem  kbytes   quota   limit   grace   files   quota   limit   grace
/lustre/haven/user/user-x
                3415000       0       0       -   44628       0       0       -

Figure 3.6 – Output of the lfs quota Command

Get Striping Information

Get Striping Information

The lfs getstripe command lists the striping information for a file or directory. The syntax for getstripe is:

lfs getstripe [--quiet|-q] [--verbose|-v]
              [--stripe-count|-c] [--stripe-index|-i]
              [--stripe-size|-S] [--directory|-d]
              [--recursive|-r]

When querying a directory, the default striping parameters set for files created in that directory are listed. When querying a file, the OSTs over which the file is striped are listed.

Several parameters are available for retrieving specific striping information. These are listed and described in Table 3.4.

ParameterDescription
–quietLists details about the file’s object ID information.
–verbosePrints additional striping information.
–countLists the stripe count (how many OSTs to use).
–indexLists the index for each OST in the file system.
–offsetLists the OST index on which file striping starts.
–sizeLists the stripe size (how much data to write to one OST before moving to the next OST).
–directoryLists entries about a specified directory instead of its contents (in the same manner as ls -d).
–recursiveRecurses into all sub-directories.

The example in Figure 3.7 shows that new_file has a stripe count of eight on OSTs 10, 0, 1, 18, 29, 25, 35, and 38.

[user-x@acf-login6 user-x]$ lfs getstripe new_file 
new_file
lmm_stripe_count:  8
lmm_stripe_size:   1048576
lmm_pattern:       1
lmm_layout_gen:    0
lmm_stripe_offset: 10
	obdidx		 objid		 objid		 group
	    10	     346481992	   0x14a6e548	             0
	     0	     343517968	   0x1479ab10	             0
	     1	     338587558	   0x142e6fa6	             0
	    18	     333848714	   0x13e6208a	             0
	    29	     321869616	   0x132f5730	             0
	    25	     324975397	   0x135ebb25	             0
	    35	     293636193	   0x11808861	             0
	    38	     281296846	   0x10c43fce	             0

Figure 3.7 – Output of lfs getstripe on new_file

Now observe how the --quiet option is used to list only information about a file’s object ID.

[user-x@acf-login6 user-x]$ lfs getstripe --quiet new_file 
new_file
	obdidx		 objid		 objid		 group
	    10	     346481992	   0x14a6e548	             0
	     0	     343517968	   0x1479ab10	             0
	     1	     338587558	   0x142e6fa6	             0
	    18	     333848714	   0x13e6208a	             0
	    29	     321869616	   0x132f5730	             0
	    25	     324975397	   0x135ebb25	             0
	    35	     293636193	   0x11808861	             0
	    38	     281296846	   0x10c43fce	             0

Figure 3.8 – Output of the lfs getstripe Command with the –quiet Option

The next example in Figure 3.9 shows the output when querying a directory.

[user-x@acf-login8 user-x]$ lfs getstripe -d new_dir
stripe_count:  8 stripe_size:   1048576 stripe_offset: -1

Figure 3.9 – Output of lfs getstripe on a Directory

Set Striping Patterns

Files and directories inherit striping patterns from the parent directory. However, you can change them for a single file, multiple files, or a directory using the lfs setstripe command. The lfs setstripe command creates a new file with a specified stripe configuration or sets a default striping configuration for files created in a directory. The usage for the command is:

lfs setstripe [--stripe-size|-S stripe_size] [--stripe-count|-c stripe_cnt]
              [--stripe-index|-i]

Descriptions of the optional parameters are given in Table 3.5.

ParameterDescription
–stripe-size stripe_sizeNumber of bytes to store on an OST before moving to the next OST. A stripe_size of 0 uses the file system’s default stripe size, (default is 1 MB). Can be specified with k (KB), m (MB), or g (GB), respectively.
–stripe-count stripe_cntNumber of OSTs over which to stripe a file. A stripe_cnt of 0 uses the file system-wide default stripe count (default is 1). A stripe_cnt of -1 stripes over all available OSTs, and normally results in a file with 80 stripes.
–stripe-index start_ost_index
or
–offset start_ost_index
The OST index (base 10, starting at 0) on which to start striping for the file. The default value for start_ost is -1 , which allows the MDS to choose the starting index.

Shorter versions of these sub-options are also available, namely -s, -c, -o and -i, as given in the usage above. Note that not specifying an option keeps the current value.

Setting the Striping Pattern for a Single File

You can specify the striping pattern of a file by using the lfs setstripe command to create it. This enables you to tune the file layout more optimally for your application. For example, the command in Figure 3.10 will create a new zero length file named file1 with a stripe size of 2MB, and a stripe count of 40.

$ lfs setstripe -S 2m -c 40 file1

Figure 3.10 – Specifying the Stripe Size and Stripe Count of a File

Be aware that you cannot alter the striping pattern of an existing file with the lfs setstripe command. If you try to execute this command on an existing file, it will fail. Instead, you can create a new file with the desired attributes using lfs setstripe and then copy the existing file to the newly created file.

Setting the Striping Pattern for a Directory

Invoking the lfs setstripe command on an existing directory sets a default striping configuration for any new files created in the directory. Existing files in the directory are not affected. The usage is the same as lfs setstripe for creating a file, except that the directory must already exist. For example, to limit the number of OSTs to 2 for all new files to be created in an existing directory dir1 you can use the command shown in Figure 3.11.

$ lfs setstripe -c 2 dir1

Figure 3.11 – Changing the Stripe Count on a Directory

Setting the Striping Pattern for Multiple Files

You cannot directly alter the stripe patterns of a large number of files with lfs setstripe, but you can by taking advantage of the fact that files inherit the directory’s settings. First, create a new directory setting its striping pattern to your desired settings using the lfs setstripe command. Then copy the files to the new directory and the files will inherit the directory settings that you specified.

Using the Non-Striped Option

There are times when striping will not help your application’s I/O performance. In those cases, it is recommended that you use Lustre’s non-striped option. You can set the non-striped option by using a stripe count of 1 along with the default values for stripe index and stripe size. The lfs setstripe command for the non-striped option is shown in Figure 3.12.

$ lfs setstripe -c 1 dir1

Figure 3.12 – Setting a Directory to No Striping

Striping across all OSTs

You can stripe across all the OSTs by using a stripe count of -1 along with the default values for stripe index and stripe size. The lfs setstripe command for striping across all OSTs is shown in Figure 3.13.

$ lfs setstripe -c -1 dir1

Figure 3.13 – Striping a Directory Across all OSTs

I/O Best Practices

Lustre is a shared resource by all users on the system. Optimizing your IO performance will not only lessen the load on Lustre, but it will save you compute time as well. Here are some pointers to improve your code’s performance.

Working with large files on Lustre

Lustre determines the striping configuration for a file at the time it is created. Although users can specify striping parameters, it is common to rely on the system default values. In many cases, the default striping parameters are reasonable, and users do not think about the striping of their files. However, when creating large files, proper striping becomes very important.

The default stripe count on the cluster’s Lustre file system are not suitable for very large files. Creating large files with low stripe counts can cause IO performance bottlenecks. It can also cause one or more OSTs (Object Storage Targets, or “disks”) to fill up, resulting in I/O errors when writing data to those OSTs.

When dealing with large Lustre files, it is a good practice to create a special directory with a large stripe count to contain those files. Files transferred to (e.g., scp/cp/gridftp) or created in (e.g., tar) this larger striped directory will inherit the stripe count of the directory. Figure 4.1 shows how to create a large striped directory on the cluster.

[user-x@acf-login6 ~]$ cd $SCRATCHDIR
[user-x@acf-login6 user-x]$ mkdir large_files
[user-x@acf-login6 user-x]$ lfs setstripe -c 30 large_files/
[user-x@acf-login6 user-x]$ lfs getstripe -d large_files/
large_files/
stripe_count:  30 stripe_size:   1048576 stripe_offset: -1

Figure 4.1 – Creating a Large Stripe Directory

In the above example, the default stripe count for the directory is set to 30. For directories, the stripe count should be set to the expected size of the files in the directory. For files, one stripe per 100GB of data is sufficient. For instance, a 3TB file could use a stripe count of 30. For much larger files, a stripe count of -1 is preferred so that the files are striped across all the OSTs.

Examples

A tar archive can be created and placed within the directory with a large stripe size. The archive will inherit the stripe size of the directory. Figure 4.2 shows how to use the tar command to create the archive and place it within the appropriate directory.

[user-x@acf-login6 ~]$ cd $SCRATCHDIR
[user-x@acf-login6 user-x]$ tar cf large_files/sim_data.tar sim_data/
[user-x@acf-login6 user-x]$ ls -l large_files/
total 1
-rw-r--r--. 1 user-x user-x 10240 May  8 10:48 sim_data.tar

Figure 4.2 – Creating a tar Archive in the large_files Directory

This will tar up the sim_data directory and places it in the larger striped directory. Note, one can add the “j” flag for the bz2 compression (the file would change to sim_data.tar.bz2).

Conversely, if one has a large tar file in the LARGE_FILES directory, and this tar file contains many smaller files, it can be extracted to a separate directory with a smaller stripe count. Figure 4.3 demonstrates this process.

[user-x@acf-login6 user-x]$ mkdir small_stripe
[user-x@acf-login6 user-x]$ lfs getstripe small_stripe/
small_stripe/
stripe_count:  2 stripe_size:   1048576 stripe_offset: -1
[user-x@acf-login6 user-x]$ tar xf large_files/sim_data.tar -C small_stripe/
[user-x@acf-login6 user-x]$ ls -l small_stripe/
total 4
drwxr-xr-x. 2 user-x user-x 4096 May  8 10:47 sim_data

Figure 4.3 – Extract a tar Archive to a Separate Directory with a Smaller Stripe Count

This will extract the tar file into a directory with a default stripe count of 2.

Opening and Checking File Status

Opening and Checking File Status

Open files read-only whenever possible

If a file to be opened is not subject to write(s), it should be opened as read-only. Furthermore, if the access time on the file does not need to be updated, the open flags should be O_RDONLY | O_NOATIME. If this file is opened by all files in the group, the master process (rank 0) should open it O_RDONLY with all of the non-master processes (rank > 0) opening it O_RDONLY | O_NOATIME.

Limit the number of files in a single directory using a directory hierarchy

For large scale applications that are going to write large numbers of files using private data, it is best to implement a subdirectory structure to limit the number of files in a single directory. A suggested approach is a two-level directory structure with sqrt(N) directories each containing sqrt(N) files, where N is the number of tasks.

Stat files from a single task

If many processes need the information from stat on a single file, it is most efficient to have a single process perform the stat call, then broadcast the results. The C and Fortran code snippets in Figures 4.4 and 4.5 show how to broadcast a stat call from a single process.

MPI_Comm_rank( MPI_COMM_WORLD, iRank );
if(!iRank)
{
  iRC=lstat( PathName, &sB );
}
MPI_Bcast( &sB, size(struct stat), MPI_CHAR, 0, MPI_COMM_WORLD );

Figure 4.4 – Broadcast a Stat Call within C

      INTEGER iRank
      INTEGER*4 sB(13)
      INTEGER ierr

      CALL MPI_COMM_RANK(MPI_COMM_WORLD, iRank, ierr)
          IF (iRank .eq. 0) THEN
          CALL LSTAT(PathName, sB, ierr)
      ENDIF
      CALL MPI_BCAST(sB, 13, MPI_INTEGER, 0, MPI_COMM_WORLD, ierr)

Figure 4.5 – Broadcast a Stat Call within Fortran

Avoid opening and closing files frequently

Excessive overhead is created when file I/O is performed by:

  • Opening a file in append mode
  • Writing a small amount of data
  • Closing the file

If you will be writing to a file many times throughout the application run, it is more efficient to open the file once at the beginning. Data can then be written to the file during the course of the run. The file can be closed at the end of the application run.

Use the Appropriate Striping Technique

Use the Appropriate Striping Technique

Place small files on single OST

If only one process will read/write the file and the amount of data in the file is small (< 1 MB to 1 GB) , performance will be improved by limiting the file to a single OST on creation. This can be done using the command in Figure 4.6.

$ lfs setstripe PathName -s 1m -i -1 -c 1

Figure 4.6 – Limiting a Small File to a Single OST

Place directories containing many small files on single OSTs

If you are going to create many small files in a single directory, greater efficiency will be achieved if you have the directory default to 1 OST on creation. Figure 4.7 shows how to create a directory that is limited to one OST.

$ lfs setstripe DirPathName -s 1m -i -1 -c 1

Figure 4.7 – Limiting a Directory to a Single OST

All files created in this directory will inherit the 1 OST setting.

This is especially effective when extracting source code distributions from a tarball as depicted in Figure 4.8.

$ lfs setstripe DirPathName -s 1m -i -1 -c 1
$ cd DirPathName
$ tar -x -f TarballPathName

Figure 4.8 – Extracting Source Code into a Single OST Directory

All of the source files, header files, and other items only span one OST. When you build the code, all of the object files will only use one OST. The binary will span one OST, but it can copied using the commands in Figure 4.9. Figure 4.10 shows how to modify the Makefile to copy a binary.

$ lfs setstripe NewBin -s 1m -i -1 -c 4
$ rm -f OldBinPath
$ mv NewBin OldBinPath

Figure 4.9 – Copying a Binary

OldBinPath:   ...
	rm -f OldBinPath
	lfs setstripe OldBinPath -s 1m -i -1 -c 4
	cc -o OldBinPath ...

Figure 4.10 – Modifying the Makefile to Copy the Binary

Set the stripe count and size appropriately for shared files

Single shared files should have a stripe count equal to the number of processes which access the file. If the number of processes accessing the file is greater than 160 then the stripe count should be set to -1 (max 160). The stripe size should be set to allow as much stripe alignment as possible. A single process should not need to access stripes on all utilized OSTs. Take into account the structure of the shared file, number of processes, and size of I/O operations in order to decide on a stripe size which will maximize stripe-aligned I/O.

Set the stripe count appropriately for applications which utilize a file-per-process

Files utilized within a File-per-process I/O pattern should utilize a stripe count of 1. Due to the large number of files/processes possible it is necessary to limit possible OST contention by limiting files to a single OST. At large scales, even when a stripe count of 1 is utilized, it is very possible that OST contention will adversely affect performance. The most effective implementation is to set the stripe count on a directory to 1 and write all files within this directory.

IO Considerations

IO Considerations

Read small, shared files from a single task

Instead of reading a small file from every task, it is advisable to read the entire file from one task and broadcast the contents to all other tasks. Figure 4.11 shows how to do this in C. Figure 4.12 shows how to accomplish this in Fortran.

int  iRank;
int  iRead;
char cBuf[SIZE];

MPI_Comm_rank( MPI_COMM_WORLD, iRank );
if(!iRank) {

  iFD=open( PathName, O_RDONLY | O_NOATIME, 0444 );
//          Check file descriptor

  iRead=read( iFD, cBuf, SIZE );
//          Check number of bytes read
}
MPI_Bcast( cBuf, SIZE, MPI_CHAR, 0, MPI_COMM_WORLD );

Figure 4.11 – Reading a File from One Task and Broadcasting It in C

INTEGER iRank
      INTEGER iRead
      INTEGER ierr
      CHARACTER cBuf(SIZE)

      CALL MPI_COMM_RANK(MPI_COMM_WORLD, iRank, ierr)
      IF (iRank .eq. 0) THEN
          OPEN(UNIT=1,FILE=PathName,ACTION='READ')
          READ(1,*) cBuf
      ENDIF
      CALL MPI_BCAST(cBuf, SIZE, MPI_CHAR, 0, MPI_COMM_WORLD, ierr)

Figure 4.12 – Reading a File from One Task and Broadcasting it in Fortran

Use large and stripe-aligned I/O where possible

I/O requests should be large, e.g., a full stripe width or greater. In addition, you will get better performance by making these stripe aligned, where possible. If the amount of data generated or required from the file on a client is small, a group of processes should be selected to perform the actual I/O request with those processes performing data aggregation.

Standard output and standard error

Avoid excessive use of stdout and stderr I/O streams from parallel processes. These I/O streams are serialized by aprun. Limit output to these streams to one process in production jobs. Debugging messages which originate from each process should be disabled in production runs. Frequent buffer flushes on these streams should be avoided.

Application Level

Application Level

Subsetting IO

At large core counts I/O performance can be hindered by the collection of metadata operations (File-per-process) or file system contention (Single-shared-file). One solution is to use a subset of application processes to perform I/O. This action will limit the number of files (File-per-process) or limit the number of processes accessing file system resources (Single-shared-file).

  • The example in Figure 4.13 creates an MPI communicator that only includes I/O nodes (a subset of the total number of processes). This example also shows independent and collective I/O with MPI-I/O.
! listofionodes is an array of the ranks of writers/readers
  call MPI_COMM_GROUP(MPI_COMM_WORLD, WORLD_GROUP, ierr)
  call MPI_GROUP_INCL(WORLD_GROUP, nionodes, listofionodes, IO_GROUP,ierr)
  call MPI_COMM_CREATE(MPI_COMM_WORLD,IO_GROUP, MPI_COMMio, ierr)
! open
  call MPI_FILE_OPEN
&  (MPI_COMMio, trim(filename), filemode, finfo, mpifh, ierr)
! read/write
  call MPI_FILE_WRITE_AT
&  (mpifh, offset, iobuf, bufsize, MPI_REAL8, status, ierr)
! OR utilizing collective writes
!  call MPI_FILE_SET_VIEW
!&  (mpifh, disp, MPI_REAL8, MPI_REAL8, "native", finfo, ierr)
!  call MPI_FILE_WRITE_ALL
!&  (mpifh, iobuf, bufsize, MPI_REAL8, status, ierr)
! close
call MPI_FILE_CLOSE(mpifh, ierr)

Figure 4.13 – Creating a Subset of Processes to Perform I/O

  • If you cannot implement a subsetting approach, it would still be to your advantage to limit the number of synchronous file opens. This is useful for limiting the number of requests hitting the metadata server.

Parallel Libraries

Managing one’s IO can be performed at the application level with re-tooling one’s code or implementing additional libraries. Some examples of these additional middleware applications are ADIOS, HDF5, and MPI-IO.

Recognize situations where file system contention may limit performance

When an I/O pattern is scaled to large core counts performance degradation may occur due to file system contention. This situation arises when many more processes than file system resources can handle request I/O nearly simultaneously. Examples include file-per-process I/O patterns which utilize over ten-thousand processes/files and single-shared-file I/O patterns which utilize over five-thousand processes accessing a single file. Potential solutions involve decreasing the number of processes which perform I/O simultaneously. For a file-per-process pattern this may involve allowing only a subset of processes to perform I/O at any particular time. For a single-shared file pattern this solution may involve utilizing more than one shared-file in which a subset of processes perform I/O. Additionally, some I/O libraries such as MPI-IO allow for collective buffering which aggregates I/O from the running processes onto a subset of processes which perform I/O.