 Explore
 Write
Write Chat
Chat Call
Call
High Performance & Scientific Computing
Access and Login on ISAAC ORI
Service navigation
Introduction
The focus of this document is accessing the ISAAC-ORI from various terminal programs using ssh (Secure Shell). To learn how to access the ISAAC-ORI through Open OnDemand in a web browser, please refer to the Open OnDemand document, but note that Open OnDemand is not supported on ISAAC-ORI at this time. This document assumes you currently possess a valid user account and have familiarity with remote access methods.
Here are the login hostnames:
Login Node: login[1-4]
Hostname for SSH: login[1-4].ori.isaac.utk.edu
ssh (Secure Shell)
To access ISAAC-ORI resources, you must connect with a Secure Shell client. In MacOS and most Linux distributions, a ssh client is built-in to the operating system. On Windows, PuTTY and MobaXterm can be used to provide ssh capability. Review the documentation on those clients to learn about their usage. Recent updates to Windows 10 have added built-in support for ssh. If it is not installed on your version of Windows, please refer to Microsoft’s documentation on OpenSSH. It can then be accessed with the Command Prompt or Windows PowerShell in the same way you would access ssh from a terminal within MacOS or Linux.
Duo Two-Factor Authentication
In addition to a ssh client, you will need the Duo app on your mobile device. The app can be downloaded from the Apple App Store for iOS users or from Google Play for Android users. New users should be automatically enrolled in Duo; existing users, however, must associate their UT NetID with their ISAAC account. To do this, navigate to the ISAAC user portal and click the link to associate your UT NetID with your ISAAC account. If you skipped Duo enrollment when you created your ISAAC account, then you must also associate your UT NetID with your account. For more information on Duo, visit their website.
Connecting to the ISAAC-ORI
For MacOS and Linux Users
To begin, open a terminal. At the prompt, type ssh <NetID>@. Replace <NetID> with your UT NetID. When prompted, supply your NetID password. Next, type 1 and press Enter (Return). A Duo Push will be sent to your mobile device. You may use the 2 options to receive a SMS message on your mobile device with a code you should provide at the prompt. Regardless of the Duo option, you will be logged into the ISAAC-ORI once you successfully authenticate.login1.ori.isaac.utk.edu
For Windows Users
On Windows, the process for connecting to the ISAAC-ORI depends on the client you use. If you run an updated Windows 10 machine, you may use PowerShell or Command Prompt to access ssh. Either terminal will work for connecting to the ISAAC-ORI. Once you open either PowerShell or Command Prompt, follow the same steps MacOS and Linux users use to connect to the ISAAC-ORI.
For older Windows systems, such as Windows 7 or 8, you should use PuTTY to connect to the ISAAC-ORI. Launch PuTTY. Make sure the “Session” menu is selected in the left pane. In the right pane, type login1.ori.isaac.utk.edu
Troubleshooting Login Issues
Inactive Accounts
Accounts that are not used for one year are disabled. If you believe your account has been disabled due to inactivity, please submit a ticket to the OIT Help Desk (see https://help.utk.edu).
Password Changes
If you know your current NetID password and desire to change it, navigate to the password management page and log in. Once you authenticate with your username, password, and Duo, continue through the account protection prompt. Specify a new password that complies with UT’s password policies and accept the AUP (acceptable use policy) to change your NetID password.
If you do not know your current NetID password and desire to change it, navigate to the password reset page. Provide the necessary information to authenticate, then continue through the account protection prompt. Provide a new password that complies with UT’s password policies and accept the AUP to change your NetID password.
If you continue to have issues with your NetID password, please submit a ticket to OIT HelpDesk.
Key Mismatches
When you log in to the ISAAC-ORI for the first time, your ssh client will warn you about an unknown host key. This is normal behavior and should not cause alarm. Generally, the ssh client will show the host’s key fingerprint and ask if you wish to continue. Select “yes” when this option is presented to you. At that point, the ISAAC-ORI’s host key will be added to your system, which will prevent future prompts. Be aware, however, that ssh host keys can change, and when they do, the ssh client will dramatically warn you. Figure 6.1 shows this warning. It is necessary to edit your ssh known_hosts file to remedy this error. If you have reasonable suspicion that this is a legitimate security concern and not a case of mismatched keys, please submit a ticket to OIT HPSC.
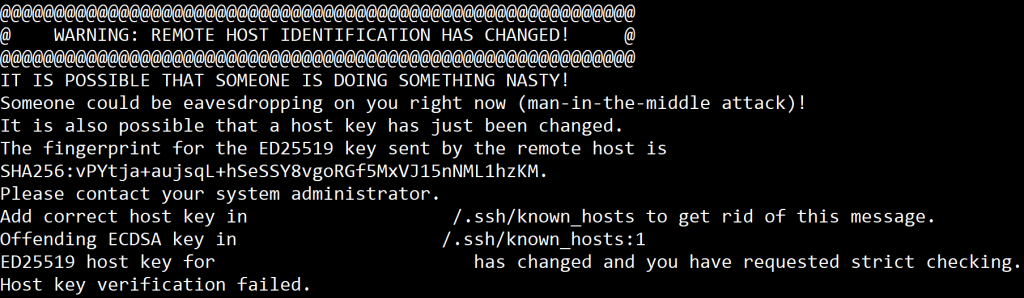
If you receive this warning, it means that the key your system associates with the ISAAC-ORI is no longer valid. Again, this should not be cause for alarm unless there is reason to suspect a legitimate security concern. Instead, modify your known_hosts file to remove the old key so that ssh can register the new one. The ssh-keygen command allows you to modify this file without breaking ssh.
To edit your known_hosts file on a MacOS or Linux system, open a terminal. Type ssh-keygen -R <hostname> and press Enter (Return). Replace the <hostname> argument with login1.ori.isaac.utk.edulogin1.ori.isaac.utk.edu
On updated Windows 10 systems, follow the process used to remove ssh host keys from MacOS and Linux. Both PowerShell and Command Prompt support the ssh-keygen command.
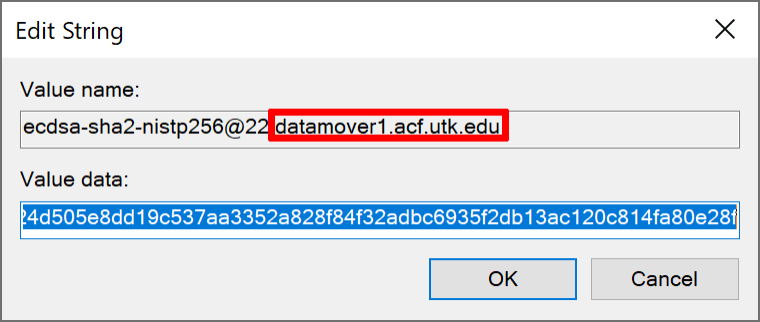
For older Windows systems that run PuTTY, ssh host keys are stored within the registry. Proceed with caution when editing the Windows registry. Incorrect modifications could result in system instability. To begin, open the Registry Editor. You can open this utility by searching for it from the Start menu or by opening the Run menu and typing regedit. When it opens, navigate to the following location from the left pane: HKEY_CURRENT_USER\Software\SimonTatham\PuTTY\SshHostKeys
All the host keys known to PuTTY will appear. Before you delete any of the keys, double-click on them to verify that they belong to the offending hosts. The name of the host will appear under the “Value name:” header. Figure 6.2 identifies where the hostname will appear. Once you verify that the key belongs to the offending host, right-click on it to delete it. PuTTY should then allow you to save the host’s new key upon your next login attempt.